Professional tilers and craftsmen know: a flawless surface is key to achieving perfect results. However, especially when working with large format tiles or uneven substrates, so-called lippage – uneven height differences between neighbouring tiles – can quickly occur. This is where wedge levelling systems come in, ensuring a uniform laying height, maximum precision, and significantly less rework.
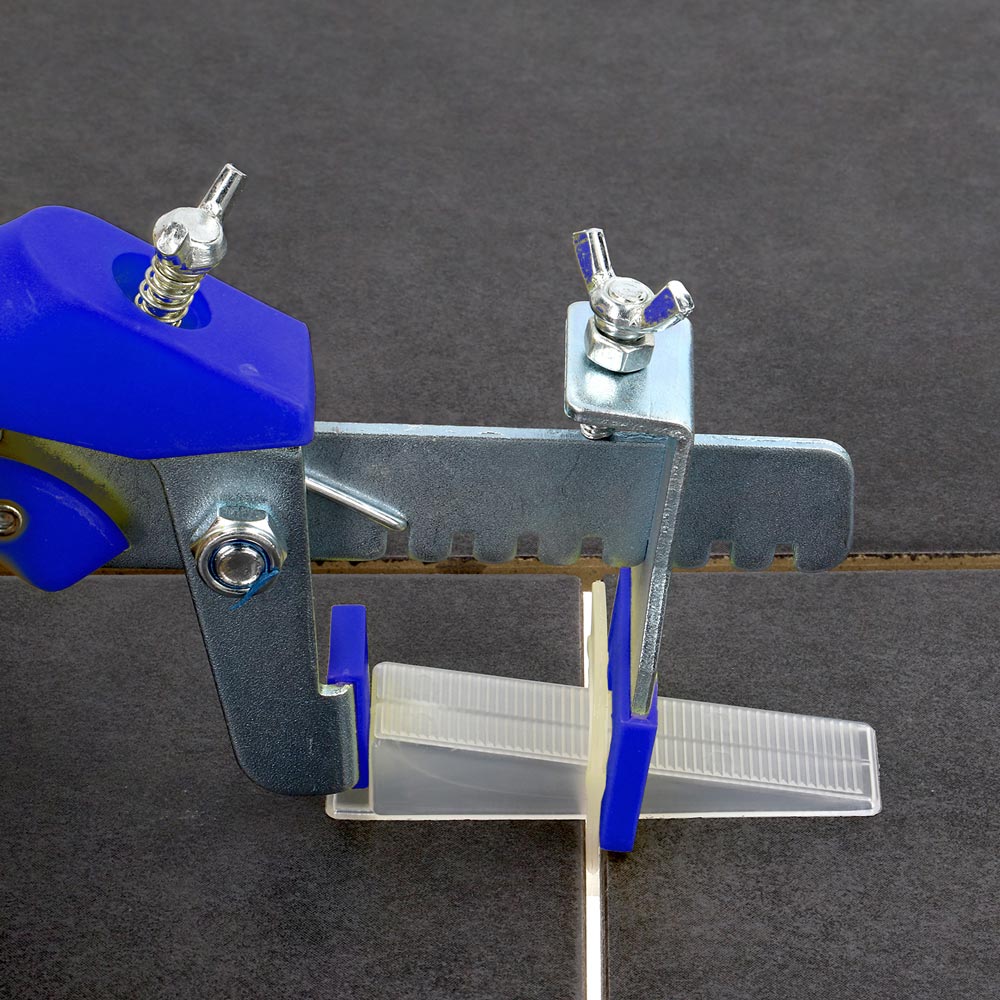
A wedge levelling system is a proven method to prevent lippage when laying tiles. It consists of a three-part system made up of levelling wedges, corresponding pull tabs, and a special tile pliers. This system allows tiles to be laid quickly, precisely, and cleanly – even on larger areas or with large formats.
Typical applications: bathrooms, kitchens, living areas, balconies, patios – anywhere that requires clean transitions and maximum accuracy.
FAQ for the Tile Leveling Wedge System – Detailed and Clearly Explained
How many clips do I need per square meter?
The number of clips required depends on the tile size and the planned joint layout. For 60×30 cm tiles, you typically need around 22 clips per m², while 60×60 cm tiles require approximately 11 clips per m².
The exact quantity of leveling clips depends on the tile dimensions and the installation pattern. For medium-sized tiles such as 60×30 cm, around 22 clips per square meter are recommended to ensure a uniform and level tile surface. Larger tiles like 60×60 cm require fewer clips, usually about 11 pieces per m². Sufficient clip usage prevents height differences between tiles and ensures a professional and perfectly even tile finish.
Are the wedges reusable?
Yes, the wedges are made of durable plastic and can be cleaned and reused for multiple tiling projects.
The wedges in the leveling wedge system are manufactured from robust and long-lasting plastic, allowing them to be reused many times. After removing the clips, the wedges can easily be cleaned and stored for future use. This makes the system cost-effective, environmentally conscious, and especially practical for frequent or large-scale tiling jobs.
What is the tile leveling plier used for?
The leveling plier ensures that the wedge is inserted into the clip with controlled and even pressure, allowing precise height alignment.
The tile leveling plier plays a crucial role in applying the wedge with consistent pressure into the clip. This ensures that both tiles are aligned to the exact same height, preventing uneven tile surfaces. Without using the plier, there is a risk of applying force unevenly, leading to inaccuracies. Especially with large or heavy tiles, the plier ensures clean, effortless, and professional installation results.
Plastic plier or metal plier – which is better?
Plastic pliers are lightweight and suitable for occasional use, while metal pliers offer more durability and are ideal for professional daily use.
Choosing between a plastic or metal leveling plier depends on how often the tool will be used. Plastic pliers are lightweight and easy to handle, making them ideal for DIY projects or smaller renovations. Metal pliers, on the other hand, are designed for continuous use, providing high stability and durability for professional tilers. Both versions work perfectly with the wedge leveling system, so the best choice depends on your work volume and expectations.
Are all components compatible with each other?
Yes, all wedges, clips, and pliers within the Karl Dahm leveling system are fully compatible.
The wedge leveling system from Karl Dahm is based on a modular design. This means all components—clips, wedges, and pliers—can be freely combined and expanded as needed. Whether you start with a set or purchase individual parts later, everything fits together seamlessly. This ensures maximum flexibility and prevents unnecessary additional purchases.
Is it better to buy a set or individual components?
A complete set is ideal for starting a new project, while individual packs are useful for restocking as needed.
A starter set includes all essential components of the wedge leveling system and is therefore perfect for new installations or first-time users. If over time you use up certain elements like clips faster than wedges, you can easily reorder only what you need. This ensures flexibility and efficient cost management for ongoing tiling work.
Is using a wedge leveling system absolutely necessary?
It’s not strictly required, but it greatly simplifies installation and improves the final result.
A wedge leveling system is not mandatory when laying tiles, but it significantly improves work accuracy and surface quality. It prevents tile lippage (height differences) and ensures a smooth, even finish. This is particularly beneficial with large-format tiles, uneven substrates, or high visual expectations. Many professional tilers rely on leveling systems for exactly these reasons.
What is the difference compared to a rotating (spin) leveling system?
The wedge system works with wedges and pliers, while the rotating system uses twistable caps and requires no tools.
In the wedge leveling system, the wedge is inserted into the clip using a plier, providing strong stabilizing pressure. The rotating (or spin) leveling system uses screw-on caps instead, which are tightened by hand. While the rotating system is faster and tool-free, the wedge system provides superior pressure and stability—especially important when working with heavy or large-format tiles. Many professionals use both systems depending on the situation.
How do you remove the wedges and clips after installation?
After the adhesive has fully cured, the clips are broken off in the direction of the joint, and the wedges are collected for reuse.
Once the tile adhesive has completely set, the clips are broken off by applying lateral pressure along the grout line, either with the foot or using a rubber mallet. The wedges detach automatically and remain undamaged. They can then be cleaned and stored for future tiling work. This makes the system efficient and economical.
Is there special accessory for corrections and adjustments?
Yes, for example the SOS clip repair set and the tile lifter for precise adjustments.
Karl Dahm provides helpful accessory tools for finishing work and small corrections. The SOS clip repair set allows damaged clips to be replaced locally without removing entire tiles. The tile lifter makes it easy to lift, adjust, or reposition tiles with precision. This is particularly useful when handling large-format tiles or delicate surfaces.
Is it worthwhile to use special accessories like DKS wedges or Kleberex?
Yes, they improve accuracy and provide cleaner and more precise results.
DKS wedges enable finer height adjustments and are particularly suitable for sensitive or premium tile materials such as natural stone or thin porcelain tiles. Kleberex assists in removing excess adhesive before leveling, preventing debris from affecting tile alignment. Both accessories enhance precision, working comfort, and overall finish quality.
Can I combine the wedge system with other Karl Dahm tiling tools?
Yes, the system is fully modular and can be combined with other tools for maximum flexibility.
The wedge leveling system is designed to integrate smoothly with Karl Dahm’s wider range of tiling tools, such as tile cutters, lifters, and joint cleaning tools. This allows you to expand your equipment step by step and adapt it perfectly to different job requirements. The result is efficient workflow and consistently professional tiling quality.


 4000x")


 100x")

 300x")