Sale


EUR
148,00 Excl. VAT
*
EUR
176,12 VAT included
*
RRP: € 295,57
In Stock


 Filter


Threaded levelling clips are the foundation for precise, lippage-free tile installation. Especially in professional tiling projects with large-format or rectified tiles, every millimetre counts. Karl Dahm offers a comprehensive range of clip types tailored to practical site requirements, making high-quality tiling more efficient and reliable.
Uneven subfloors, varying tile thicknesses, or inconsistent adhesive beds can quickly lead to unsightly lippage. These edge differences not only disrupt the visual result but can also cause complaints. A professional levelling system based on threaded clips solves this problem. The clips are placed under the tiles and secured using a reusable tension cap that is twisted onto the threaded stem, ensuring even height alignment and a smooth tile surface.
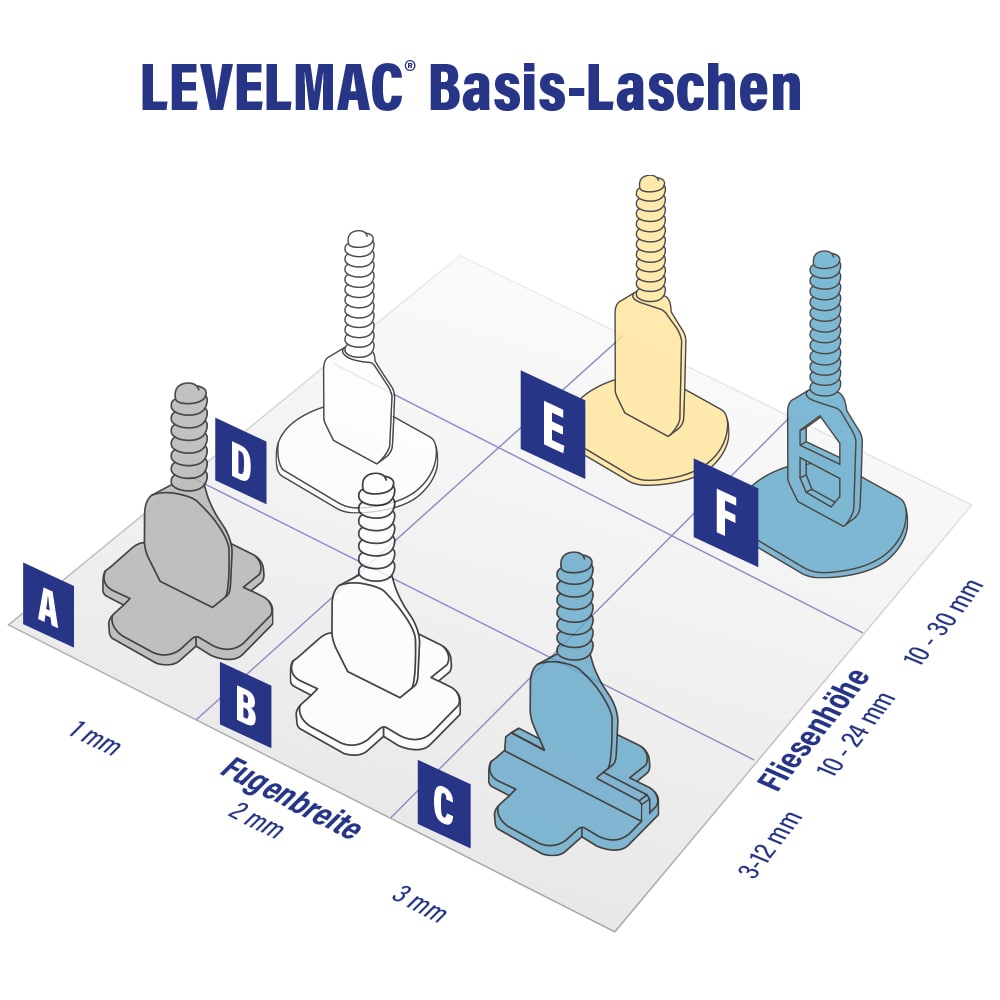
With options such as base clips, cross clips, T-clips, and long clips for thicker tiles, every installation requirement is covered. Once the adhesive sets, the clips snap off at the designated break point and remain invisible beneath the tiles.
Base Spacers (Standard Length)
Long Spacers (for Tiles up to 30 mm)
Cross Spacers (for Cross Installation)
T-Spacers (for T Installation)
This selection allows flexible adjustment to any tile format and laying style. Whether in a private bathroom or large construction sites – there is the right spacer for every challenge.
Your joint width and tile format determine the ideal clip type. For sensitive surfaces, use protective pads or washers. All clip types are compatible with Levelmac tension caps and can be mixed and matched freely – offering maximum flexibility on site.
The right clip depends on the tile thickness and layout. Standard base clips are suitable for straight surfaces. For edge-to-edge corner placements or cross joints, T-clips and cross clips ensure consistent and clean grout spacing. For very thick tiles or natural stone slabs, long clips help compensate for the increased material height.
Leveling clips are designed to break off at the base once the adhesive has set, remaining permanently under the tile. Therefore, they are not reusable. The rotating caps, however, are durable and designed for repeated use, making them a long-term investment.
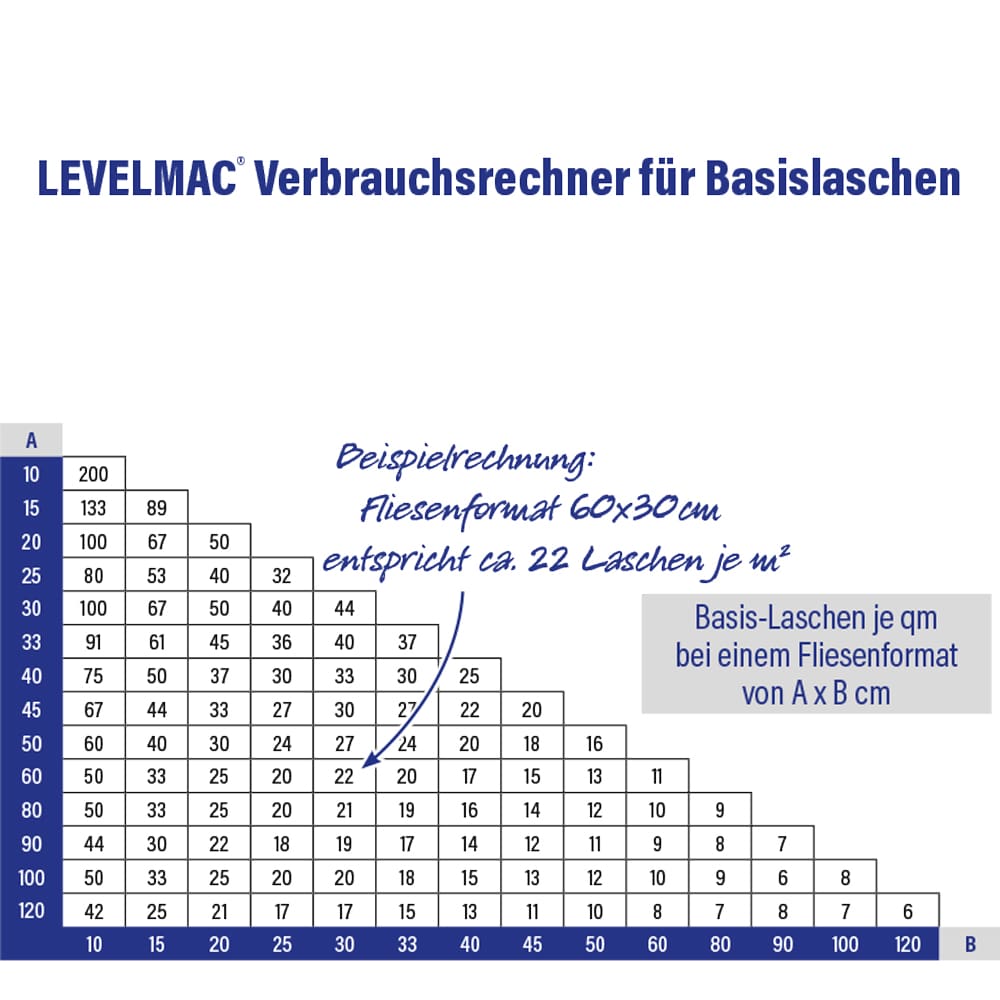
The number of required leveling clips depends on the tile format and grout spacing. Smaller tiles need more clips, while large-format tiles require fewer. Common usage estimates:
• 60 × 30 cm tiles: ~22 clips/m²
• 60 × 60 cm tiles: ~11 clips/m²
• 120 × 60 cm tiles: ~8 clips/m²
For exact calculations, base it on the number of tiles per box and layout pattern.
Most rotary tile leveling systems are modular. This means that all clip variations are compatible with the same rotating caps. You can therefore combine different clips within the same tiling project without any issues.
With a rotary system, the cap is simply screwed onto the clip to level the tiles. This allows controlled and gradual pressure without additional tools. Wedge systems require a wedge and a tensioning tool, applying more point-focused pressure. While wedge systems can offer strong grip for very heavy tiles, rotary systems are usually faster and more user-friendly.
Starter sets typically include clips, caps, and sometimes helpful accessories. This makes them perfect for initial projects. However, professionals or repeat users often prefer purchasing additional clips separately, especially when rotating caps are already available.
A leveling system prevents lippage (height differences between tiles) and ensures clean, even grout lines. While smaller tiles on a perfectly flat surface may not require a system, large-format tiles or demanding layouts benefit greatly from leveling support.
Highly polished or delicate tile surfaces may show pressure marks when the caps are tightened. Protective pads or rubberized spacers placed under the caps distribute pressure and protect the tile surface from abrasion.
For large areas, a rotary cap driver or drill adapter allows tightening the caps ergonomically from a standing position. This improves speed and reduces back strain, making installation faster and more comfortable.
Rescue/SOS clips are special add-on clips that allow tile leveling adjustments after placement. They prevent the need to lift or loosen surrounding tiles, providing an efficient correction method.
Threaded leveling systems are well-suited for terraces, balconies, and garden installations. When working with thick outdoor slabs, using long clips ensures proper leveling. Always pair with frost-resistant tile adhesive and proper drainage.
Rotary systems provide precise, ergonomic, step-by-step leveling by twisting the cap. Wedge systems insert a wedge through a clip and tighten it using a tension tool. Both work well, but rotary systems are generally more user-friendly, while wedge systems are favored for very large or dense tile formats.
Count on Karl Dahm – your tiling partner for over 65 years.